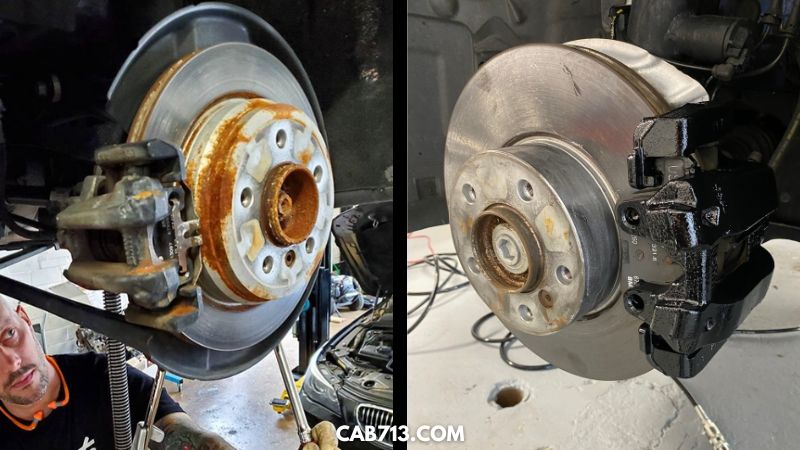
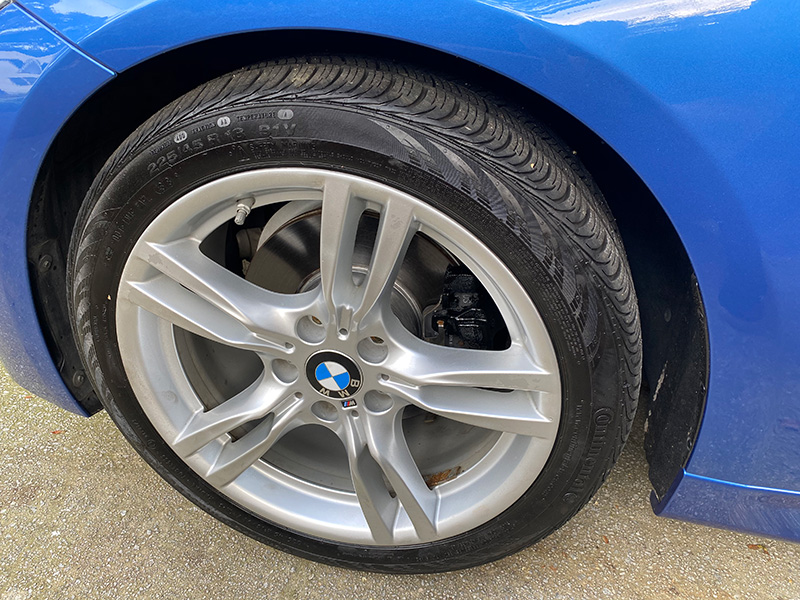
I purchased my current daily driver in July of 2020. It’s a 2017 BMW 330i MSport Wagon. When it arrived on a transport truck one thing I quickly noticed was how terrible the rotors and brake calipers looked. They were extremely rusty and grungy looking. Yuk. I needed to remedy that pronto. I followed the steps in this article and had great success. The featured image above shows the before and after of my car’s rotors and brake calipers. And here’s the result with the wheel back on. Much nicer!
A few words about rotors…
Car rotors are an important part of your vehicle’s braking system. They help to dissipate heat and prevent the brakes from getting too hot. Over time, however, they can become worn down and need to be replaced. When replacing your car’s rotors, it is important to choose the right ones for your vehicle. Otherwise, you may end up with a less-than-optimal braking experience.
There are two main types of car rotors: vented and solid. Vented rotors are designed to allow air to flow through them, which helps to keep them cool. Solid rotors, on the other hand, are not as efficient at dissipating heat but are less likely to warp.
When choosing rotors, it is important to consider the type of driving you do. If you do a lot of stop-and-go driving, for example, then you will want to choose vented rotors. If you do mostly highway driving, however, solid rotors may be a better choice.
In addition to the type of rotor, you also need to consider the material. The most common materials used for car rotors are cast iron and ceramic. Cast iron is durable and can handle a lot of heat, but it is also heavy. Ceramic rotors are lighter than cast iron but can be more expensive.
No matter what type of rotor you choose, make sure that it is compatible with your car. You can usually find this information in your owner’s manual or by contacting the manufacturer.
Cause of Rusting Rotors
There are a few key reasons that can cause your rotors to develop rust. One of the most common reasons is moisture. When your brakes get wet, either from rain or from condensation, it can cause the metal to start to corrode. This is especially true if there is any salt present, as salt speeds up the corrosion process.
Another common cause of rusting rotors is brake dust. Every time you use your brakes, tiny bits of metal are worn away. These metal shavings mix with other debris and form a black powdery substance called brake dust. If this brake dust isn’t cleaned off regularly, it can cause the rotors to rust.
Finally, rotors can also rust simply from age. Over time, the metal will start to break down and become more susceptible to corrosion. If you don’t regularly inspect and clean your rotors, they may eventually develop rust.
If you notice any rust on your rotors, it’s important to have them checked out by a professional. Rust can cause the rotors to become warped or uneven, which can lead to brake problems. In severe cases, the rotors may need to be replaced.
If you live in an area with a lot of humidity, then your rotors may be more susceptible to rusting. This can happen even if you don’t use your car often.
To help prevent this, make sure that you dry your rotors off after washing your car. You can also consider using a rust-inhibiting spray on them from time to time.
If your rotors do rust, then you may be able to sand them down and repaint them. However, this is not always the best option, as it can affect the performance of your brakes.
You may also want to consider upgrading to a different type of rotor that is less susceptible to rusting. Ceramic brakes are a good option, as they don’t rust rotors.
Removing Rust from Rotors
If you have rotors that are starting to show signs of rust, there are a few things you can do to clean them up and prevent further damage.
But before that, we will need the tools in removing rust from rotors.
- Wrench
- Wire brush
- Sandpaper
- Rust converter
- Primer
- Paint
1. Use appropriate tools to remove the rotor from the car. If the rotor is rusty, it may be stuck on the hub. In this case, you may need to use use a hammer to loosen it.
2. Once the rotor is of the car, use a wire brush to remove any rust that is on the surface. Be sure to brush in the direction of the grain to avoid damaging the rotor.
3. If there is still rust after brushing, use sandpaper to remove it. Start with coarse grit and then move to a finer grit until the surface is smooth.
4. Once the surface is free of rust, apply a rust converter to any areas that are still rusty. This will help to prevent rust from coming back.
5. Allow the converter to dry completely before moving on to the next step.
6. Use a drill to make holes in the rotor. The holes should be evenly spaced around the perimeter of the rotor.
7. Place the rotor on a heat-resistant surface.
8. Use a torch to heat the rotor until it is red hot. Be sure to wear gloves and safety glasses when doing this step.
9. Once the rotor is red hot, use a hammer to strike it evenly around the circumference. This will cause the metal to expand and contract, which will help to break the bond between the rust and the metal.
10. Allow the rotor to cool completely before removing it from the heat-resistant surface.
11. Use a wire brush to remove any remaining rust from the surface of the rotor.
12. Place the rotor on a clean, dry towel and allow it to air dry completely.
13. Inspect the rotor for any cracks or damage. If there is any damage, replace the rotor before proceeding.
14. Reassemble the brakes and test them before driving the vehicle.
15. If the brakes are still not functioning properly, take the vehicle to a qualified mechanic for further diagnosis and repairs.
One of the most important things to do for your car is to get it cleaned and maintained. Brake dust can cause rust which will make you lose years of its life span.
Related Article: How To Remove Rust From Brake Rotors Without Removing Wheel

I’ve been a working drummer for 35+ years now and have lots of experience (good and bad) with lots of different gear. I’ll be writing how-to articles, comparison guides, FAQs, etc.., on topics ranging from acoustic drums, hardware, cymbals and accessories. I plan to post some fun video as well! I hope you’ll find this website useful in your quest for drumming knowledge:)

