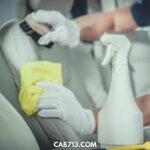
You just finished a long day at work and all you want to do is relax. But as soon as you get in your car, you hear a loud screeching noise. You realize that it’s your brakes. They sound terrible and they’re probably in need of a good cleaning. But who has the time or money to take their car to a mechanic? Especially when all you need is to clean the brakes.
Luckily, there are ways that you can have clean brakes without having to remove the wheels. By following some simple steps and using the right materials, you can have your brakes cleaned in no time at all.
A brake system on your car should always be checked for wear and tear, as well as any cracks that may appear. If you find anything wrong with it then don’t hesitate to get them fixed before it’s too late.
What are Common Brake Problems
Soft brake pedal
This is one of the most common break problems. If you find that your brake pedal is getting softer, then this indicates that there is a problem with the hydraulic system. It could be a leak somewhere, or it could be that the fluid level is low. Either way, it’s something that needs to be fixed as soon as possible.
A car pulls to one side when braking
If you find that your car is pulling to one side when you brake, then this is usually an indication of a problem with the brakes themselves. It could be that one of the pads is worn out, or it could be that the caliper is sticking. Either way, it’s something that needs to be fixed as soon as possible.
If you hear a squealing noise when you brake, then this is usually an indication that the pads need to be replaced. However, it could also be a sign that the rotors are damaged and need to be replaced. Either way, it’s something that needs to be fixed as soon as possible.
The steering wheel shakes when brakes are applied
When your car shakes, there are many possible causes. One of them is that you have a warped front rotor or hot spots on the pads due to excess heat and pad impressions from sitting for too long without moving around in traffic; this also occurs if rainwater gets into certain areas where rust can develop quickly because it’s not protected by anti-acid chemicals like other parts of vehicle structure do. The pad impressions create a pulsating effect when we use brakes at low speeds or if there are heavy rains outside; otherwise known as “brake squeal.”
The brake pedal pulses up and down
The constant stopping and starting that you do on your car may be causing the brakes to wear out faster. As they age, rotors go through a heating cycle thousands of times before being warped, this is why we recommend replacing them with new ones every few years (or when needed). If it’s only occurred once after many long drives at high speeds then there might not yet be any damage done but if things keep deteriorating like this.
The whole car shakes when brakes are applied
Have you ever noticed how your whole car shakes when applied with brakes? This could be just the rear ones. As a rule of thumb, shaking in front will make people feel it mostly through their steering wheel while there are other ways for shakenness to manifest itself in various parts of our vehicle – including the backseat.
List of Tools and Materials Needed
To have clean brakes, you will need the following:
A bucket
The bucket will be used to hold the water and soap mixture.
Warm Water
You can prepare a bucket of warm water for cleaning.
Detergent or soap
Use a detergent or soap for cleaning the brakes.
A brush
The brush will be used to scrub the brake pads and calipers.
A cloth or rag
The cloth or rag will be used to wipe away any dirt or debris.
Brake cleaner (optional)
Brake cleaner is optional but can be used to help remove any stubborn grime.
How to Start Cleaning the Brakes without Removing the Wheels
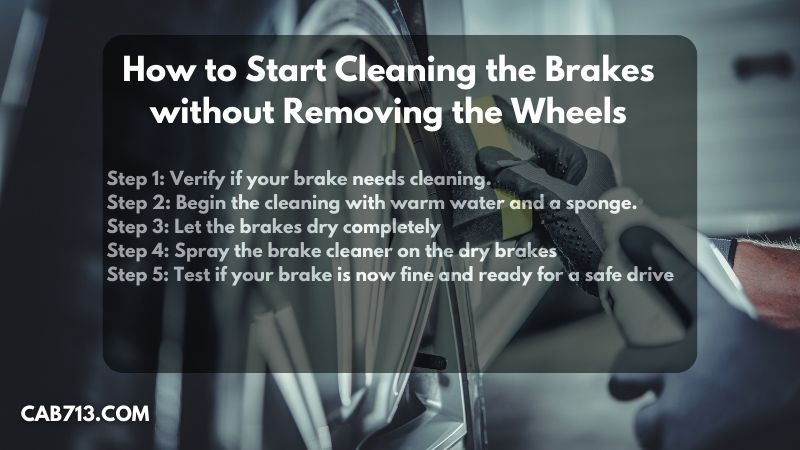
Step 1: Verify if your brake needs cleaning.
You need to verify if your brake needs cleaning by checking the brake pads. To verify if your brake needs cleaning, you should check the brake pads. If there is a noticeable increase in the Brake pedal travel, then that’s an indication that the pads may have become excessively contaminated and need to be cleaned. If there is also a grinding noise when you come to a stop, that’s another sign that your brake pads may be dirty and in need of attention. The problem with contaminated brake pads is that they can significantly reduce the effectiveness of your brakes, making it more difficult to come to a stop promptly. In extreme cases, they can even cause your brakes to fail. As such, it is important to clean your brake pads regularly to ensure that they can function properly.
Step 2: Begin the cleaning with warm water and a sponge.
Brake pads and shoes press against the brakes to create friction that stops your vehicle. Over time, this process wears down these parts- including rotors or drums; which are made up of steel particles from brake pad material as well other materials like road debris and dirt grease. The result generates dust. With that, you can begin the cleaning with warm water and a sponge to remove the dirt. You can also add soap or detergent to loosen the dirt from the brake so it can be removed easily. Brush the wheels and brakes to clean them thoroughly. Once that dirt is removed, clean the brakes with another bucket of water.
Step 3: Let the brakes dry completely
The brake cleaner should be applied to dry wheels. If you apply it while they’re still wet, the liquid will just run off and ruin your day! So make sure one side of each wheel has had enough time for everything else go smoothly. While one wheel is drying out, move on to the next one and clean it with some warm water. This will ensure that you get all of your car’s wheels cleaned for them to be at their best.
Step 4: Spray the brake cleaner on the dry brakes
Now that the brakes are completely dried out, it is time to use the brake cleaner so you can get rid of all that icky residue on your brakes. The product will remove grease, dust, and other contaminants- just what we need. To get the best possible results from your brake cleaning, make sure that you apply it properly and thoroughly. Apply an equal amount of cleaner on each wheel’s rim by spraying through all openings equally; don’t miss any spots or leave behind residue.
Step 5: Test if your brake is now fine and ready for a safe drive
After applying the brake cleaner and giving it some time to work its magic, it is now time to see if your brakes are now clean and working as they should. The best way to do this is by taking your car for a short drive in an empty parking lot or a quiet street. While driving, make sure to pay attention to how your brakes feel. If they feel softer or spongier than usual, then you might need to bleed your brakes. On the other hand, if your brakes feel stiff or unresponsive, then you might need to replace your brake pads.
Conclusion
Cleaning your brakes without removing the wheels is a simple process that anyone can do. By following the steps outlined in this guide, you can ensure that you have clean brakes and working properly. With just a few supplies and a bit of time, you can keep your car’s brakes in top condition.
Related Article: How To Clean Car Alloy Wheels

I guess you always start out as a car kid. Smokey and the Bandit, Corvette Summer, Bullitt, Ronin, etc. Throw in a massive match box car collection and add time. I’ve always been drawn to interesting cars. I’ve also always owned used cars, so detailing and some light wrenching were always on the list. My hope is that we can share some knowledge of the do’s and don’ts learned along the way. Be sure to share your own knowledge in the comments!